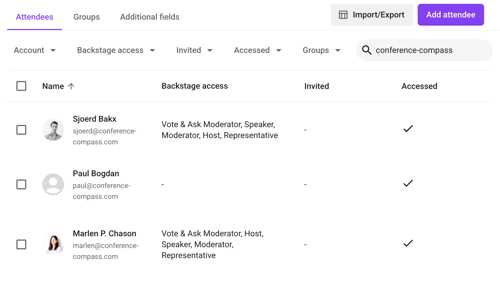
What can the attendee list be used for?
In the event menu, below Attendees, you can manage your event attendees and the groups they are in. This list can be used to restrict access to the event, to send invitation emails or to create groups for access restriction or targeted news messages.
Users on the attendee list of an event are automatically also added to your community.
Add or import users to the attendee list
On the tab Attendees, you can find a list of all your attendees. A user is identified by its email address, which needs to be unique: two users in the same community cannot have the same email address to sign in with. The email address associated with the user account cannot be changed.
Attendees can be added manually one at a time, or in batch by importing a spreadsheet. You can also sync an external system to the attendee list, so that you only have to update the attendees in one system.
Manually add attendees
Click the button Add attendee to manually add a new attendee. First enter the email address: if the attendee is already in your community, first name and last name will be added automatically. If not, add the first and last name. Optionally select (a) group(s), and click Add.

Import attendees from an Excel sheet

You can also import users from an Excel sheet. Choose Import/Export and first download the template.
After filling it in, click Import from Excel sheet and select the template file. Optionally, you can directly assign the imported users to a group. Please note that if you try to import users that already exist (meaning the email address is already there), they are not overwritten.
Validate the file and click Import to complete the process.
Import attendees from an external system
With an attendee sync, you can link an external system to the studio. You can then sync the attendees periodically to the studio. Read this article to learn more about the attendee sync.
Customise attendee profiles
In the attendee profile, a default set of fields is available, for example title, name and biography. If you want your attendees to share other things with each other, such as their region or their interests, you can add other fields on the tab Additional fields.

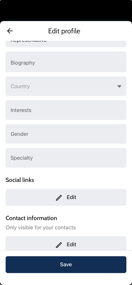
The fields added here, provided they are set to Visible to attendees, are available for the attendees to fill in when editing their profile. You can also connect an attendee sync to them using the Field id, so that users do not have to fill in the fields themselves. The input can be free text, one option, or multiple options. For the last two, you can enter the options users can choose from. The order of the fields is as specified in the table. Fields can be reordered with the drag handle on the left.
In the app, the visible additional fields are also shown in the public profile that can be opened from the attendee list. In the search bar above the attendee list, you can search for the values that were added. If you for example add a State field, searching for 'texas' in the search bar above the attendee list will return all users that have added 'Texas' in this field.
Tip! Add a subtitle to the attendee list to explain what additional fields attendees can search on, besides name, job title and company.
Configure groups for access restriction or targeted messages
On the tab Groups, you can create event or community groups. Event groups can only be used within the selected event, community groups can be used across events. The groups can for example be used to restrict access to certain tabs or pages in the app, or to send targeted push notifications.
Any user in the attendee list can be added to a group. Open the user details and scroll down to the Groups section.
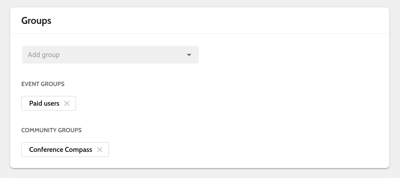
Select the group immediately, or start typing the group's name to filter the groups being shown in the list. You can also batch-assign users to a group by selecting them in the list with the tick box and clicking Add to a group.
![]()
Note! When creating a group, think about whether the group only applies to this event, or should be accessible for any event in your app. Choose whether to create an event group or community group.
Use the table filters
You can view detailed information for each attendee by selecting their entry in the table. While edits are possible, modifying user-provided data is generally not recommended.
There are a number of filters above the attendees table. You can use these, for example, to see all reported users in one glance, or all users in a certain group. The filters can also be combined to narrow down the results even more.
Account
There are five different account statuses you can filter on:
- Not created: this person has been added through the studio but has not yet created an account in the app.
- Pending verification: this person started with the account creation, but did not verify the email address yet.
-
Created: this person has completed account creation in the app.
-
Reported: this person was reported by another app user.
-
Blocked: this person is blocked by you or a team member.
Backstage access
With this filter, you can show all users that have a certain backstage access role in this event, such as moderators or representatives. Use this for example to send an email to all representatives at once.
Invited
This allows you to filter on what attendees were sent an invitation email from the platform. Use this to easily send uninvited users an invite email or reminder.
Accessed
With this filter, you can easily see who has and who hasn't accessed the event. Use this to send a reminder to attendees that have been invited through the platform, but have not yet accessed the event.
Groups
This allows you to filter the community list on members of a certain community or event group.
Verify user accounts manually
When a user signs in to the app for the first time, he or she can create an account providing their name, last name, and email address. A verification email is sent to this email address. At the same time, the user is added to the community and the user profile will indicate that the account is not yet verified. The account is only verified, thus enabled, when the user clicks the link in the email they have received. Only once this step is completed, the user will be able to log in to the app.
When, for some reason, the user can not verify him or herself, the verification can also be done manually, but only through the community list. Read this article to see the steps to take.
Delete and block attendees
To delete attendees from the list, select them in the table and choose Remove from event:

Please note that they will remain in your app community. Deleting them completely can be done only on community level. When deleting an account, an attendee can recreate it any time, depending on access restrictions. If you want to make sure a user cannot sign in anymore, block them instead. Users cannot be blocked from an event, but only from the entire app. Check the article on how to manage your app community to read how to do so.