Manage your app community
On the Community page, you can see all users that signed in to your app. This article explains what you can do with them.
What does 'community' mean?
On our platform, each client has its own secure environment that comes with its own branded mobile app and or web app. This environment contains all tools to create and manage events. It also comes with its own secure user database that contains the user accounts and profiles and powers all engagement features. The set of all users is called the community.
The community can be accessed through the studio by clicking on Community in the side menu on the selection screen.

Users
On the tab Users, you can find a list of all users that were either added through the studio or signed in to your app already. A user is identified by its email address, which needs to be unique: two users in the same community cannot have the same email address to sign in with. The email address associated with the user account cannot be changed.
Groups
On the tab Groups, you can create community groups. These can be used later to restrict access to certain areas in the app, pages, or to send targeted push notifications. Community groups can be used across all events, as opposed to event groups, that can only be used in the event they were created in.
Any user in the community can be added to a community group. Open the user details and scroll down to the Groups section.

Select the group immediately, or start typing the group's name to filter the groups being shown in the list. You can also bulk-assign users to a group by selecting them in the list with the tick box and clicking Add to a group.

Adding and importing users to the community
Users can be added manually one at a time, or in batches by importing a spreadsheet.

Add manually
Click the button Add user to manually add a new user. Enter the email address, first name, last name and optionally groups, and click Add.

Excel import 
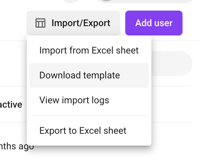
You can also import users from an Excel sheet. Choose Import/Export and first download the template.
After filling it in, click Import from Excel sheet and select the template file. Optionally, you can directly assign the imported users to a group. Please note that if you try to import users that already exist (meaning the email address is already there), they are not overwritten.
Validate the file and click Import to complete the process.
Use the table filters
You can view detailed information for each user by selecting their entry in the table. While edits are possible, modifying user-provided data is generally not recommended.
There are a number of filters above the community table. You can use these, for example, to see all reported users in one glance, or all users in a certain group. The filters can also be combined to narrow down the results even more.
Account
There are five different account statuses you can filter on:
- Not created: this person has been added through the studio but has not yet created an account in the app.
- Pending verification: this person started with the account creation, but did not verify the email address yet.
-
Created: this person has completed account creation in the app.
-
Reported: this person was reported by another app user.
-
Blocked: this person is blocked by you or a team member.
Event
This allows you to filter the community list by event, providing the same view as when accessing Attendees from within a specific event.
Groups
This allows you to filter the community list on members of a certain (community) group.
Verify user accounts manually
When a user signs in to the app for the first time, he or she can create an account providing their name, last name, and email address. A verification email is sent to this email address. At the same time, the user is added to the community and the user profile will indicate that the account is not yet verified. The account is only verified, thus enabled, when the user clicks the link in the email they have received. Only once this step is completed, the user will be able to log in to the app.
When, for some reason, the user can not verify him or herself, the verification can also be done manually through the community list. To do so, open the user profile and click the Verify manually button in the alert at the top. After you have verified manually, the user needs to refresh the web page (web app) or relaunch the app (mobile app) in order to sign in.

The verification request does not have an expiration date. If the Verify manually button is not shown on the user profile page, this can mean two things:
-
the initial account creation has not been successful.
-
the user has already verified the email address through the verification link. You could then ask the user to refresh the page (web app) or relaunch the app (mobile app).
You can see the user's account status at the bottom of the user profile page, in the History section.
Delete users
Users can be deleted from the list by selecting them with the checkbox on the left and choosing Delete in the batch edit toolbar.

This removes the account completely, including favourites, chat history, etc. It is not possible to retrieve this once deleted.
Block users
When blocking a user, he or she is signed out of the app and cannot sign in again. You can unblock them any time, allowing them to sign in again.