If you have been invited to a session as a moderator, you gain access to the moderator dashboard. Please note that this dashboard is different from the speaker dashboard. As a moderator, you are able to participate in the live session, moderate interactive features, start uploaded or pre-recorded videos, and control broadcasting. Below, we will explain every element of the dashboard and how you can use them in order to moderate the session effectively:
- Slides and speaker frames
- Live Speakers list
- Pre-recordings and videos
- Bottom toolbar (broadcasting)
- Session settings
- Interactive features
- Vote
We advise you to access the moderator dashboard in Chrome or Microsoft Edge browsers. To avoid distractions, we advise closing other applications and turning off your notifications. Please also make sure to use the same computer and internet connection before and during the conference as different settings can change your experience. For more tips read this article.
The moderator dashboard looks as follows:
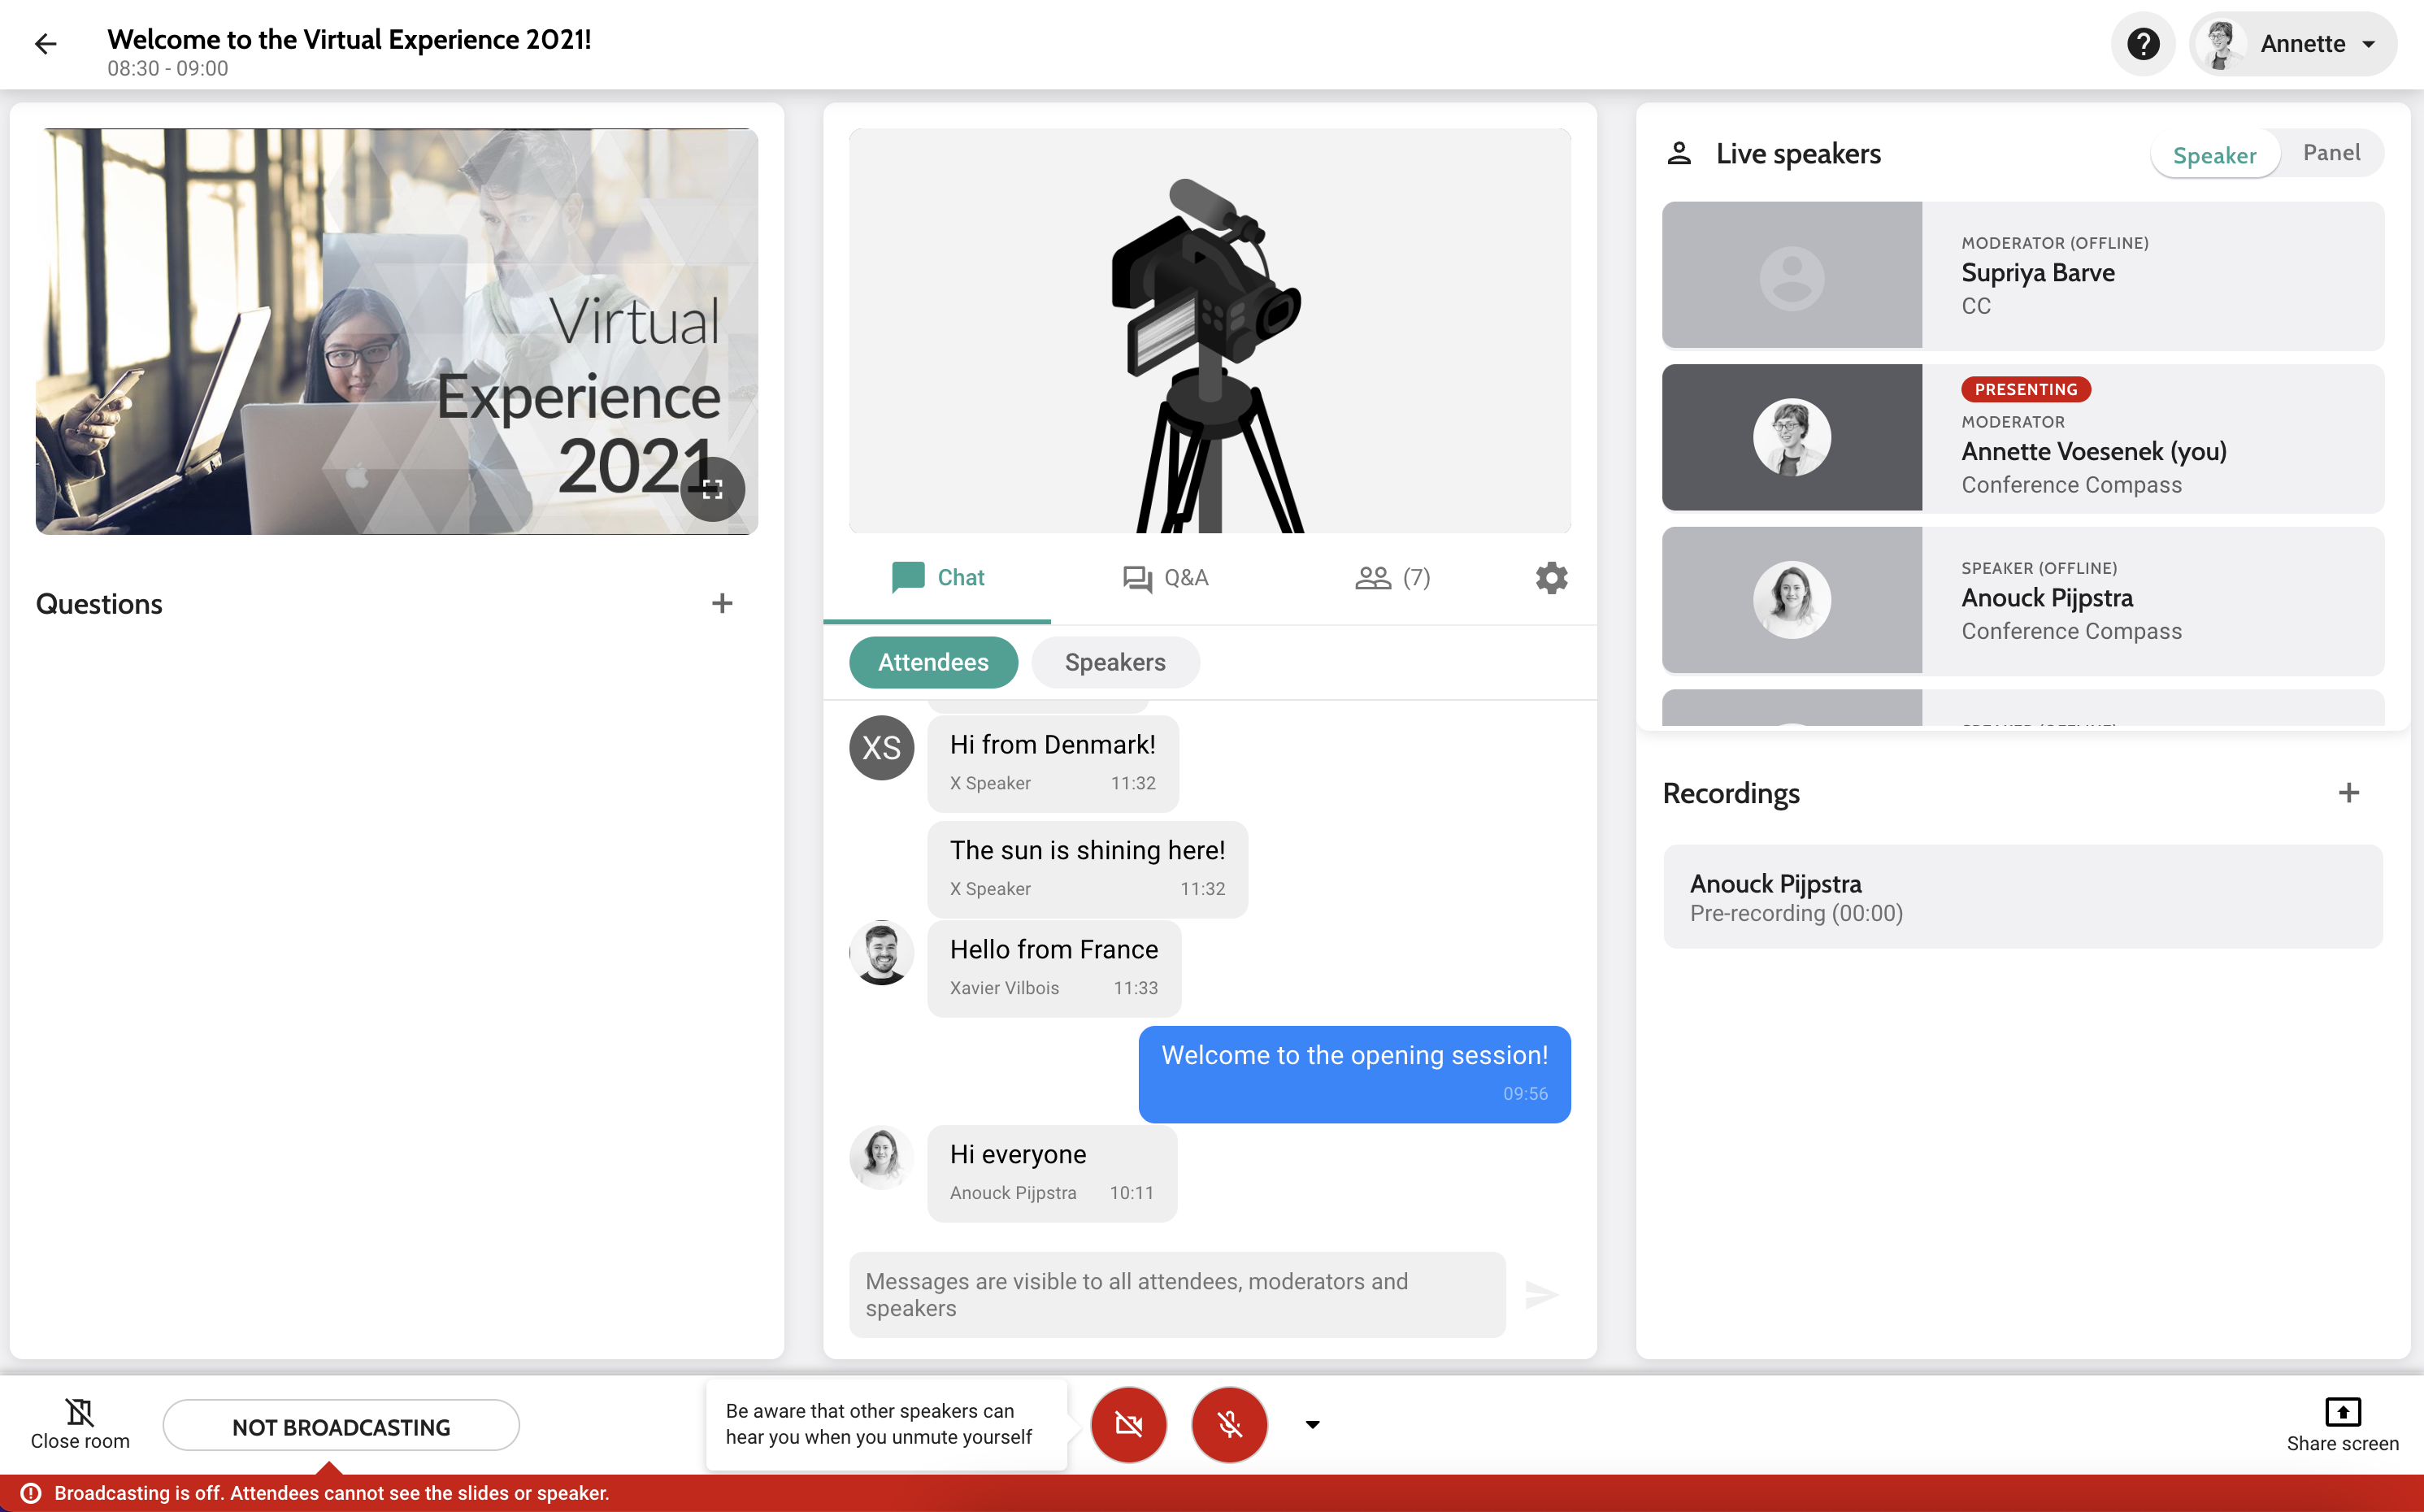
Slides and speaker frames
In the slides frame on the left and the speaker frame in the centre, you can see what the audience sees. The content depends on what you selected to be broadcasted, see the sections Switch between Speaker and Panel mode and Control the presenting speaker below.
Live Speakers list
In the list on the right, below Live speakers, you can see all moderators and speakers that have been invited to this session. You can see their names, companies and role (speaker or moderator).
-
If a user does not have the dashboard open, she's indicated as ‘offline’.
-
If a user has the dashboard open, the ‘offline’ indication disappears. Please note, that the user’s camera and microphone might be off so you won't see them, but they will still be online. In this case, they will still be able to hear you and follow instructions.
-
If the user enables their camera and microphone, you will now be able to see and hear them.
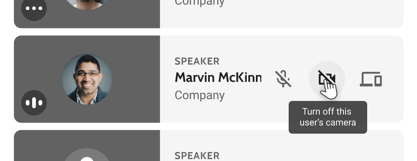
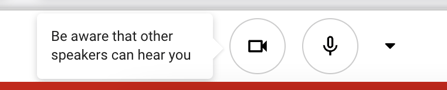
Disable camera & mute audio of speakers and moderators
All speakers and moderators can hear each other at any time unless they are muted. Speakers and moderators won't be heard by the attendees until the broadcast starts. As a moderator, you can mute speakers and other moderators by clicking the disabled-microphone icon that appears on the right side when hovering over the person’s name. Please note that you cannot unmute others; they will have to unmute themselves.
Moderators can also disable someone's camera. This is useful when you need someone to disappear from panel mode: you simply disable the camera and mute the audio of that person. You cannot enable someone's camera.
Switch between Speaker and Panel mode
At the top right, there is a switch where you can choose between Speaker and Panel mode.
-
In the Speaker mode, you can select one speaker. The speaker's slides and camera will be visible to the audience.
-
In the Panel mode, all speakers and moderators that have their camera and/or microphone enabled are visible to the audience, in a grid in the speaker frame. If someone does not want to participate, they should mute their microphone and disable their camera.
Please note that in both modes, everyone who did not mute themselves can be heard by attendees.
Control the presenting speaker
You can control which speaker or moderator is broadcasted to the audience by clicking the computer icon that appears when hovering over a person’s name. A red tag ‘Presenting’ is shown above the active speaker. The selected speaker or moderator will appear to the audience with their camera view in the speaker frame, and with their uploaded slides or shared screen in the slides frame. If no slides are uploaded or a moderator is selected, attendees will see the placeholder slide. You can switch between speakers by clicking the broadcasting button of another speaker.
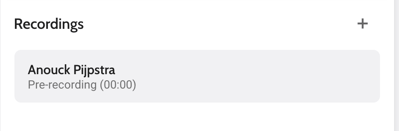
Pre-recordings and videos section
All pre-recordings that speakers made through the platform or videos that they uploaded will automatically appear in the moderator dashboard.
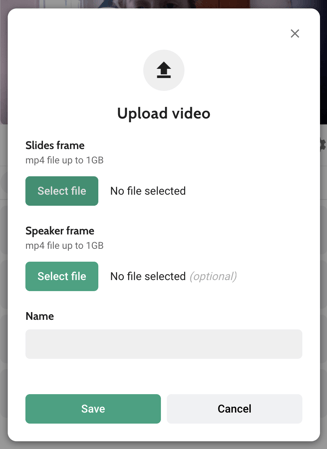
Upload video
If a recording was made on another platform or you want to play a video, you can upload it here by clicking the arrow in the top right corner of this section.
You can upload a separate MP4 file for the slides frame and the speaker frame. If you have just one file, upload it to the Slides frame.
Play pre-recordings and videos
Select the pre-recording or the uploaded video in the list just like selecting a live speaker: by clicking the computer icon that appears when hovering over the video. A label Active video will then show. Wait for it to load and then click the play icon. The label then changes in Active video, playing.
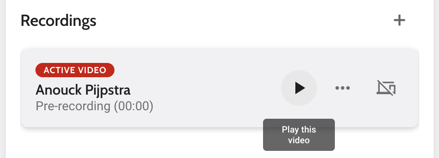
Please note that for now, you cannot pause or browse through a video or pre-recording. You can only stop and restart from the beginning.
Bottom toolbar
Enable or disable the camera and microphone
On the bottom toolbar, you can turn your camera and microphone on and off using the buttons in the centre. With the small arrow on the right side, you can select another audio or video source than the default.
Left of the camera and microphone icons, there are messages to inform you whether you are the presenting speaker or someone else is, or when you are in panel mode.
Set up RTMP
RTMP can be selected from the small dropdown right of the camera and microphone icons. More information on how to set it up can be found in a separate article.
Open/close room
You can control whether the room is open or closed in the bottom-left corner.

Attendees can only access a virtual room when it is open. We advise opening a virtual room 10-15 minutes before the session starts. This is the equivalent of allowing people some time to come into a physical room where the presentation takes place so that they can take a seat and get settled.
If a room has been opened, but the session is not broadcasting yet, the attendees in the virtual room cannot see or hear you. They can use the interactive features that you have enabled, such as chat. The attendees will only be able to see and hear you, once you start broadcasting.
Once the session is over and the broadcast has been stopped, the room does not close automatically. As a moderator, you need to select Close room, which will remove all attendees from the virtual room. They will no longer have access to the chat and Q&A and receive a notification saying that the room has been closed.
Start/stop broadcasting
When the room is open, you can control when the session is broadcasting or not using the broadcast button in the bottom-left corner.
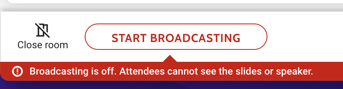
When broadcasting starts, attendees will be able to see the presenting speaker and hear all moderators and speakers that are not muted. While the session is broadcasting, it is recorded automatically. A Live tag is shown in the slides and speaker frame, and a timer starts running in the lower-left corner.
Share screen
You can share your screen using the button in the bottom-right corner.
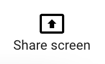
You can choose to share your entire screen (for example for Powerpoint in presentation mode), an application window, or a Chrome tab. If you would like to share a video with sound or want to include sound effects, you will need to select the Chrome tab.
If the screen share button does not respond, please check your browser settings:
- Mac: click System Preferences > Security & Privacy > Privacy > Screen Recording and add Chrome.
- Windows: if screen sharing is not working, this might be due to a missing screen sharing extension in your browser. You can check this by typing chrome://extensions/ into the address bar of your browser. If the screen sharing extension is already there, it might be enabled. In that case, you can switch it on. If the screen sharing extension is not there, please visit the Chrome Web Store to install one for free via this link.
Session settings
Below the middle speaker frame, you will find a tab bar with a gear icon on the right. Click the icon to open the session settings.
In the modal you can:
-
Upload a placeholder image for the slides and speaker frame. The slides placeholder is shown in the slides frame when a moderator or speaker without slides is broadcasted, or broadcasting hasn't started yet. The speaker placeholder is shown in the speaker frame when there is no active speaker, or broadcasting hasn't started yet. This slide should be a PNG or JPG of 1280 x 720 px and less than 2MB.
-
Choose what interactive tabs attendees see: Chat, Q&A, or the attendee list. Please note that as a moderator, you will always see all tabs, but an indication is shown on it when the tab is off for attendees
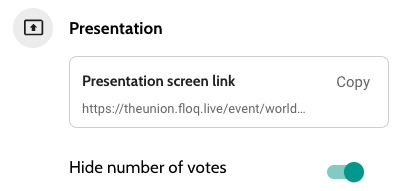
- Get the presentation link for the projector view.
-
Export all messages in the session chat with the button Export Chat. This will export a CSV file with an overview of the date/time, sender, and message content.
When clicking Save, the changes are immediately applied to the speaker and attendee dashboard.
Interactive Features
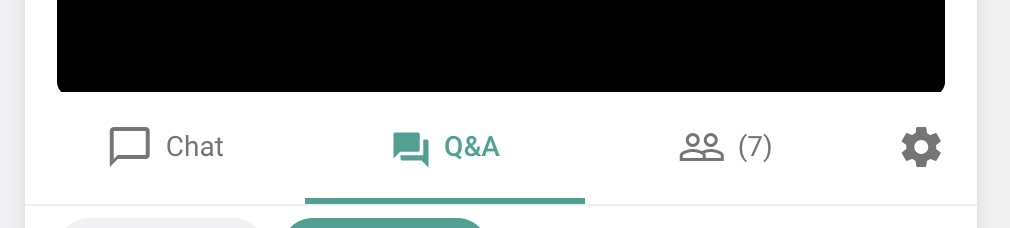
Below the slides and speaker frame, you will find the Interactive features, containing Vote, Chat, Q&A and the attendee list.
As a moderator, you always see all tabs, even though they might be disabled for attendees.
Chat
On the Chat tab, you can see the messages that are sent and send messages yourself. Messages posted under the Attendees tab are visible to everyone (attendees, speakers and moderators). Those posted under the Speakers tab are only visible to speakers and moderators.
As a moderator, you can delete messages of others from the moderator dashboard by clicking the trashcan that appears when you hover over a message. You will need to confirm that you really want to delete it.
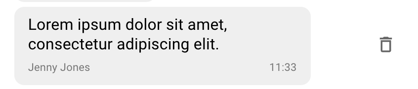
Besides that, all chat participants, either attendees, speakers or moderators, can delete their own messages.
Q&A
On the Q&A tab, you can see all incoming questions submitted by the audience. Questions appear in the Invisible tab by default. Click the eye icon to make the question visible to the audience. The question will then move to the Visible tab. The hearts indicate how many likes the question received from the audience. You can also see who asked a question.

By clicking on the three dots, you can edit a question, for instance, to correct typos or fix punctuation issues. You can choose whether you want to display the questions on your dashboard chronologically (newest first) or by popularity (most popular/most liked first).
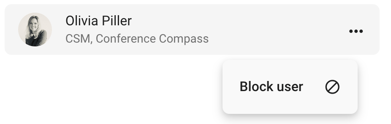
Attendees
From this tab, you can view all attendees in this session and remove unwanted attendees. Click the three-dot icon right on the attendee and select Block user. The attendee will not be able to enter again. The same button can be used to unblock attendees.
Vote
You can find the Vote section below the slides frame.

You can use the Vote feature to get the attendees’ responses to a certain question. This works as follows:
-
To add a question, click the + icon. We recommend preparing questions in advance.
-
To enable a question, select it from the list by clicking the dot on the left. This opens a new screen. You and the attendees now see the question in the slide frame, however, attendees cannot submit their vote yet.
-
To allow attendees to vote, click Start voting. When the timer is used, the voting ends automatically once the timer runs out. Otherwise, the voting ends when you click Stop voting. Attendees will see the results once they submit their vote, or when the voting ends. The speaker and moderators see the results coming in live. You can now discuss the results.
-
To go back to your moderator dashboard, click Back to slides
Via the settings modal, you can find the option to hide the number of submitted votes.
The presentation link can be used to display the votes on-site, in case of a hybrid event.
Note! You can only enable a question and start voting when you are the Presenting Speaker.