RTMP
This article describes what RTMP is, when to use it and how you can set it up on the moderator dashboard.
In this article, you can find the answers to the following RTMP Topics:
- What is RTMP?
- Why use RTMP?
- Video specifications and limitations.
- Recommended settings
- Connect your RTMP stream
- RTMP and Voting
- RTMP and Panel mode
- RTMP and Vimeo or YouTube
Please note that the RTMP is integrated into the moderator dashboard and that this dashboard needs to be opened on a computer with a built-in camera.
What is RTMP?
RTMP stands for Real-Time Messaging Protocol and is a communication protocol for streaming audio, video and data over the internet. RTMP allows low-latency streaming, meaning little time between the moment the video is captured and the moment it is displayed to the viewer.
Why use RTMP?
When connecting a camera and microphone input to the moderator dashboard, viewers won't see anything anymore whenever the moderator dashboard gets disconnected to the internet for some reason. When connecting an RTMP stream through the moderator dashboard, this stream is pushed directly to the viewers. This means the connection of the moderator does not influence what is delivered to the viewer.
Besides that, you can edit the stream before you share it with viewers, for example:
-
combine a video of the slides with that of the speaker into one video;
-
add images or text, on top of the video, such as the event logo or speaker name;
-
add transitions between different videos.
Video specifications and limitations
All video input, including RTMP, is compressed before it's delivered to attendees to make sure that also those with less bandwidth can follow the session smoothly. These video specifications can be found in another article.
Please note that though RTMP was designed for low-latency streaming, you can still experience delay, which may vary from 1 to 30 seconds.
There are a few limitations to using RTMP. Because of the delay, it is not possible to use screen sharing along with RTMP, as it is very likely that those will be out of sync. For the same reason, the RTMP stream is ignored when the moderated session is in Panel mode. Also, the session recording will only record the audio coming from the RTMP stream if that is the active speaker. Other speakers and moderators will not be recorded.
Recommended settings
- FPS: 30 FPS
- Video Bitrate: 2000 kbps
- Audio frequency: 48 kHz
- Audio bitrate: 128 kbps
- Audio: stereo sound
Please be aware that Conference Compass cannot change or downsample the incoming stream. So the sender has all the freedom to send high-quality streams but with those being well above our recommendations hiccups can occur.
Connect your RTMP stream
1. Install OBS
To use RTMP, you will need to set up a third-party streaming application. OBS (Open Broadcaster Software) is a popular tool for this. Install the tool and open it.
2. Invite a moderator
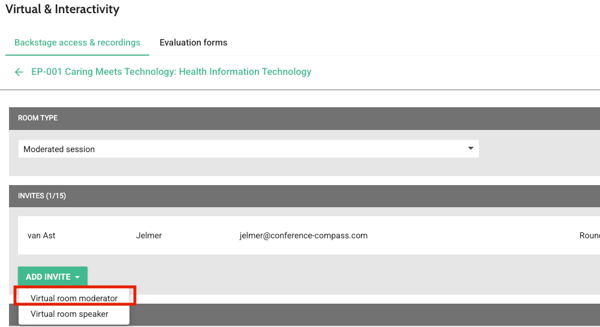
In the studio, on the page called Virtual & Interactivity, open the tab Backstage access & recording and find the session you want to use RTMP in. Open it, set it to the Moderated session, and invite yourself (or the AV) as a Virtual room moderator.

Tip! Create one account per room at the venue and invite this account as moderator to all sessions taking place in that room.
3. Enable microphone and camera
Upon entering the moderator dashboard, first, enable your microphone and camera at the bottom. The button for the microphone and camera should be now white.
If needed, give Chrome access to your microphone and camera.
4. Select the presenting speaker
In the Live Speaker list, select yourself as the presenting speaker by clicking the computer icon next to your account name. Note that if your microphone OR camera is disabled, this button will not be available.

5. Get the RTMP stream properties from the moderator dashboard
Now, you will choose the RTMP as the input source, instead of a video / audio device.
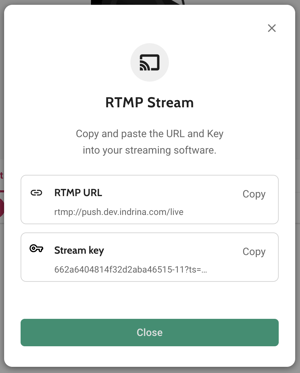
At the bottom of the screen, next to the camera and microphone icon, click the small arrow and select RTMP stream.

Click Copy next to RTMP URL.

In OBS (or another tool), go to Settings bottom right, and then choose Stream from the left menu.
Below Service, choose Custom... Now paste the URL you just copied below Server. Go back to your moderator dashboard and copy the stream key. Paste it in OBS below Stream Key. Click OK to save your changes.
Please note that the stream key expires after 48 hours, and when you change the input to microphone and back to RTMP. Make sure to start the stream before it expires; once started it will remain streaming.
6. Set up video and audio source
Default, OBS will have a Mic/Aux input, but if you use that, the sound will be very distant. You will need to mute it, and instead add your audio input device.
Furthermore, no video device is available by default, so you'll have to add one too.
To set up a video and audio source:
- Go to the bottom section, and click the + below Sources.
- Select Audio Input Capture to add a microphone.
- In the modal that opens, click Create new.
- Next, select the device you want to use.
- Repeat these steps for Video Capture Device.
You have now set up a stream.
7. Start streaming
In OBS, click Start streaming from the panel bottom right.
8. Streaming and broadcasting
You are now streaming to the moderator dashboard. You can see your RTMP stream in the middle frame. To broadcast to the audience, take the following steps:
-
You can control whether the room is open or closed in the bottom-left corner. Attendees can only access a virtual room when it is open. We advise opening a virtual room 10-15 minutes before the session starts. This is the equivalent of allowing people some time to come into a physical room where the session takes place so that they can get settled.
If a room has been opened but the session is not broadcasting yet, the attendees in the virtual room cannot see or hear your live stream yet.
-
You can control when the session is broadcasting or not using the broadcast button in the bottom-left corner. This button only appears once the room is opened. When broadcasting starts, attendees will be able to see your live stream. When the session is broadcasting, it is recorded automatically, a Live tag is shown in the slides and speaker frame, and a timer starts running in the lower-left corner.
9. Stop streaming
To stop streaming to viewers, you can do the following things:
- Stop broadcasting on the moderator dashboard; if the session ended.
-
Select another speaker or virtual moderator as an active speaker.
Use RTMP together with Vote
Since Vote is available from the moderator dashboard, you can use it together with RTMP.
Add the questions with the same account as you will be streaming RTMP from. Click the + in the left panel to add a question. For more information on how to use Vote, read the instructions in the speaker dashboard article.
Please pay attention to the delay in the RTMP. You should not start the vote directly after announcing it as the question will be immediately visible. Since the delay varies, we advise checking your delay in advance to understand how long you would have to wait before starting the vote.
On the moderator dashboard, the livestream is the same as for attendees so you should be able to start Voting at the correct moment: after the speaker has announced the vote but is no longer talking.
RTMP and Panel mode
Due to delays on the RTMP, the RTMP cannot be used in panel mode.
For discussions between virtual and on-site speakers, there are two options:
-
Use video/audio input to broadcast on-site instead of RTMP.
-
Have virtual speakers dial in through an external tool (f.e. Zoom) and include the entire discussion in the RTMP stream.
RTMP and Vimeo / YouTube
If you are broadcasting through RTMP on YouTube or Vimeo, you can add those video links on the platform. The Vimeo or YouTube URLs can be added to session banners, in news messages, or to the web app's landing page.
- For more information about RMTP on Vimeo, click here.
- For more information about RTMP on Youtube, click here.