On this page you will find information on how to submit an Android app to the Play Store for the first time, how to update an existing app on the Play Store and what graphic assets you need to release your app.
Creating the app
The app creation and publishing happens on the Play Console. All applications and their releases can be managed on the console. If you don't have a Google Play account yet, you will need to set up a new one.
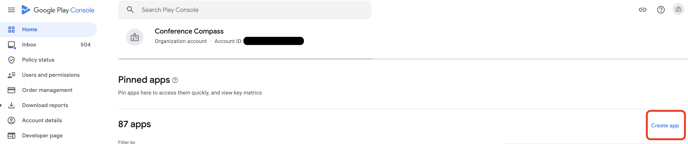
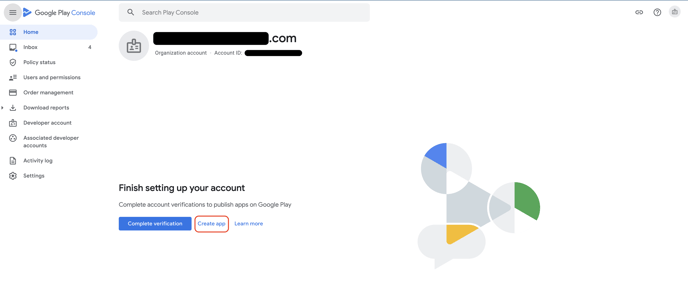
To create a new application, select Home from the menu on the left and click Create app. Depending on whether you have already created an app, the button will be located in different places.
With pre-existing apps
With no pre-existing apps
Fill in the App details section with app name, default language, select "App" for Store settings and "Free" as pricing. Make sure to check the required "Developer Program Policies", “Play App Signing” and "US export laws" boxes.
Click on "Create app" at the bottom right.
First steps
Google Console will then bring you to a dashboard where you can see all the steps for the app to be submitted and available on the Store. We recommend you to follow the onboard setup on the Dashboard. Start by clicking "View tasks" to expand the next steps.
Important: To continue on following the Initial setup, after each step go back to the Dashboard screen from the side menu and select the next one.
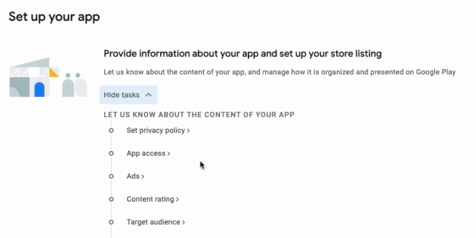
Set privacy policy
Here, paste the URL that leads to the page with your privacy policy.
Then, click on "Save".
App access
By default, you must select "All of some functionality is restricted" and click on "+ Add instructions". 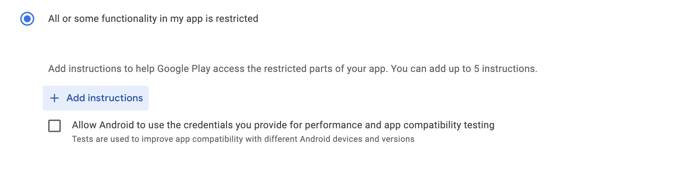
In the new window, fill in the form with instructions and a test account credentials for the Google reviewer, as otherwise the app will be rejected by the reviewer.
Click on "Add" to save the instructions and exit the window by pressing the cross in the upper right corner.
Then, click on "Save".
Ads
Select the option: "No" and Save.
Content rating
- Click on "Start questionnaire"
- Fill in you email address
- Select the category "All Other App Types" and click "Next". Fill out:

Click on "Save" and then on "Next". After checking the summary, click on "Save".
Target audience
- On Target Age, select "18 and over" and click Next.
- On Store presence, select Yes for the Appeal to Children option (This will show a label "Not designed for children" on the Store).
- Click Next and then Save.
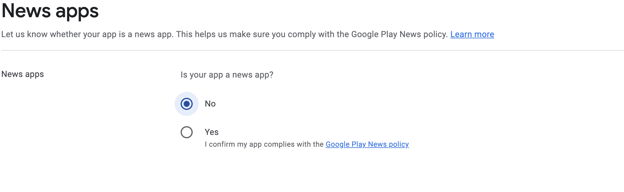
News App
- Select “No” on “Is your app a news app?” and Save.
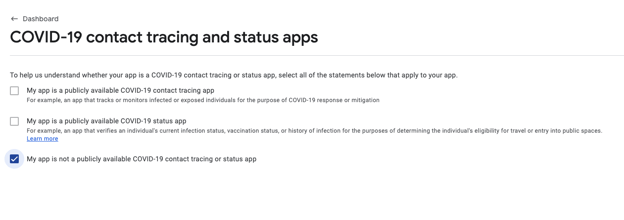
COVID-19
- Select “My app is not a publicly available COVID-19 contact tracing or status app”
Data Safety
To see how to fill the Data Safety section in, you must follow the steps described in the following article.
Government apps
We always choose "No", then Save and go back to the Dashboard.
Financial features
Scroll all the way down and tick the last box: "My app doesn't provide any financial features". Click on "Next", "Save", and go back to the dashboard.
Select an app category and provide contact details
- In App Category select App for "App or Game"
- Choose an app category
- Save and close that window
- Fill in your contact email address for that app
- Save and close that window
- Make sure to un-tick the External marketing box
- Go back to the dashboard (by clicking the top item in the left menu)
Setup your store listing
- Fill app details (name, short and full description)
- Upload app graphics (icon, feature graphic and screenshots)
- Click on Save
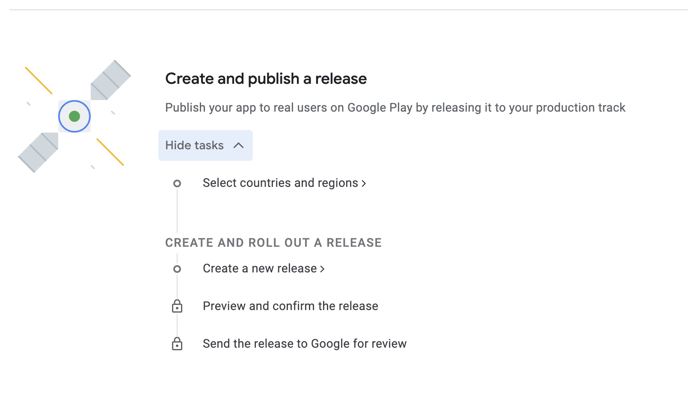
Release your app
On Dashboard now when you scroll all the way down, you should see the "Create and publish a release" section available. Click on "View tasks" and "Select countries and regions" on the last section "publish your app on Google Play".
Select countries and regions
- Click on "Add countries / regions"
- Select All
- Click on "Add" on the bottom right
Create a new release
On the top right of the page, select "Create a new release".
App integrity
Under "App integrity" click "Choose signing key", and in the new window choose "Use Google-generated key". You will eventually see a green check, saying "Releases signed by Google Play".

App Integrity
Here is where you will upload the generated AAB file - the app bundle.
- Drag your AAB file to the App bundles and wait for it to be uploaded
- On Release Name field make sure our standard version number is showing (i.e: 1.0). It will be automatically filled in once the app bundle is loaded.
- Since it's the first version of the app, you leave the release notes empty
- Click on Save
- Click on Review Release
In the new window you might see Errors and Warnings. Errors always have to be fixed.
After fixing the errors, click on "Start Rollout to Production" to submit your app for review
Graphic Assets
App icon
Your app icon as shown on Google Play. Don’t use badges or text that suggest store ranking, price or Google Play categories (such as "top", "new", or "sale").
Squared JPEG or 32-bit PNG, 512 px by 512 px, up to 1 MB
Feature graphic
This will help promote your app in different places on Google Play. In case of cropping, avoid placing text near the edges, and center key visuals.
JPEG or 24-bit PNG (not transparent), 1,024 px by 500 px, Up to 1 MB
Screenshots
Upload 2 - 8 screenshots of each device below:
Phone screenshots
JPEG or 24-bit PNG (not transparent)
Between 320 px and 3,840 px
16:9 aspect ratio (for landscape screenshots)
Up to 8 MB
7-inch tablet screenshots
JPEG or 24-bit PNG (not transparent)
Between 320 px and 3,840 px
16:9 aspect ratio (for landscape screenshots)
Up to 8 MB
10-inch tablet screenshots
JPEG or 24-bit PNG (not transparent)
Between 320 px and 3,840 px
16:9 aspect ratio (for landscape screenshots)
Up to 8 MB
Update an app
- Go to the Google Console go to All apps and select the app you wish to update by clicking on its name
- On the left menu, navigate to "Release > Production"
- On the new screen, you will see the data concerning releases
- In the upper right corner, click on "Create new release" button
- Drag the .AAB file and wait for it to upload
- Once the file is processed, make sure the release name contains the correct version number
- And then in the "What's new in this release?" right a small text that reflects what are the features or bug fixes the update contains
- Click on "Next"
- Click on "Save"
- Scroll to the end of the screen and click "START ROLLOUT TO PRODUCTION" and confirm on the dialog.
- Make sure that you see the release number you've just uploaded and the status message "Full rollout".
If you wish to edit the main store listing details such as app name, description or icon and screenshots, on the left menu navigate to "Store Presence" > "Main store listing". Edit desired information and hit the "Save" button at the bottom, "Go to overview", and there submit the changes for the review.
The update of the metadata and the app release is processed separately and may be not be available all at once to the app users.