Where can I download the session recording?
The recordings can be accessed through the Virtual & Interactivity page, Backstage access & recordings tab. Click the session you want to review the recordings of.
There are two types of recordings:
-
Pre-recordings: speakers can pre-record their presentation instead of presenting it live.
-
Session recordings: a moderated session is recorded from the moment the moderator starts broadcasting until they stop it.
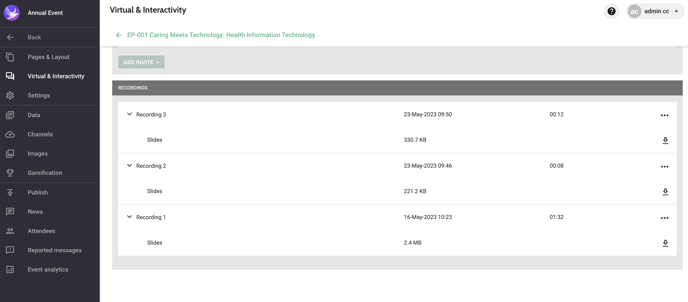
The slides and speaker frames are recorded separately in two different files for both types. The audio is added to both files. You can see the start time of the recording and its size. Furthermore, you can download the individual slides or speaker files, edit the recording name, or delete the recording.
You can also create a combined video to get one file of both the speaker and slide recording. The speaker recording is shown in the top-right of the slides, as picture-in-picture.
How can I make the session recordings visible to the attendees?
You can release the recordings one-by-one or in batches.
One-by-one
In Data > Programme items, open your session and scroll down to Virtual room. Below Settings, choose On-demand and then Platform recording.
Click Select recording.

Select the correct recording in the drop-down menu in the window that pops up.

The menu shows you all the recordings that were made within that session, including live broadcasts and pre-recordings made by the speakers.
By clicking the Play button, you can review the recording. If it needs trimming at the beginning or the end, set the start and end time accordingly. Click Save in the modal and then save the session.
Repeat these steps for all your sessions, and make a release to the app (Publish > Create release).
Batch edit
In Data > Programme items, select the programme items to which you want to link a pre-recording or session recording. In the batch-edit toolbar, choose Change room type and choose On-demand > Platform recording.

You can then choose whether you want to link the latest pre-recording or the latest session recording. Optionally, you can assign a tag to all items that have a recording. This way you can easily list them in the app.

What if my recording was created using a different virtual platform?
In this case, instead of selecting Platform recording in the drop-down menu, select External. A URL field appears, allowing you to add the URL of your recording.