![floq-logo-by-cc-2-white@2x.png]](https://knowledge.conferencecompass.com/hs-fs/hubfs/floq-logo-by-cc-2-white@2x.png?height=40&name=floq-logo-by-cc-2-white@2x.png)
We recommend enabling the virtual room at the session level. Enabling rooms at the presentation level is only relevant in the case of different presentations happening in parallel within a session. For example, poster presentations, round table discussions, or networking rooms.
To learn about room types check out this article.
Make virtual room settings visible
Before you can enable the virtual room for a session, you need to make sure that the related sections in the data editor are visible. To do that, go to the event settings and choose the tab Data types. Select the type for which you want to allow enabling virtual rooms and make sure the toggle Allow virtual or on-demand rooms is on. If it is off, you will not see the settings in the data editor.
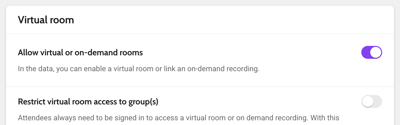
Please note that turning on or off this toggle only shows or hides the options in the studio. You will need to enable the virtual room per item.
Enable the virtual room
One by one
👉 How to choose a virtual session for a specific programme item: In Data, go to the detail page of the programme item for which you would like to enable the virtual room. Scroll down to the section Session type.
.gif?width=663&height=299&name=screen-capture%20(5).gif)
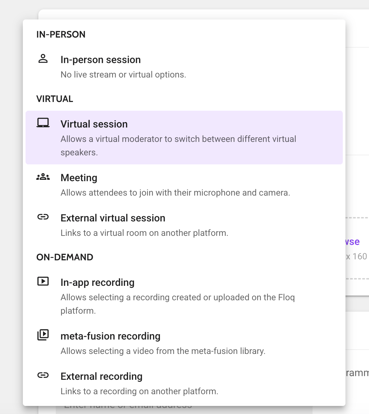
Below Settings, you can choose the session type.
- In-person session: No virtual room button is visible for this session.
Virtual room: A button “Enter virtual room” is visible for these session types. You can then choose:
- Virtual session: If you purchased our virtual event platform.
- Meeting: If you purchased our virtual event platform.
- External virtual session: Enter the URL to the external virtual room.
On-demand recording: a button “View recording” is visible for this session. This is only relevant after the session has taken place when the recording will actually be available.
Repeat these steps for all the sessions that should have a virtual room.
Batch-edit
You can also select multiple programme items with the checkmark on the left of the table and choose Change room type from the batch edit toolbar. The same options as listed above are available.
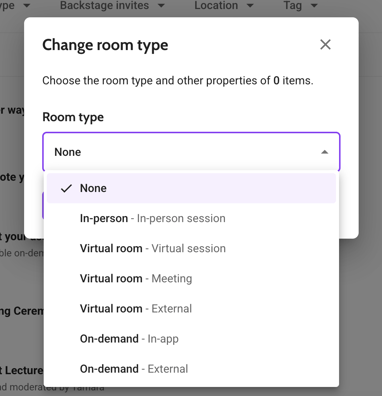
To display all virtual rooms on the app, make a release via Publish > Publish release.
Now that your rooms are enabled, head to the next step which is to create your invitation email template.