15 December 2025
Features and improvements
- You can now duplicate an entire event. Not just the structure, pages and settings are copied, but also the event data and images. You can find the option in the More menu (...) of the events in the event list.

- When importing Persons and linking them to Attendees on the attendee list through Excel, it is no longer needed to add the first name and last name if the attendee is already on the list. In that case, just the email address is sufficient. When the attendee is not yet on the list, the names are required.
- The following items can now be restricted to multiple groups, instead of just one. Please note that the app will need to be resubmitted in order to support this too.
- Society tiles, for example the new tile, info tiles or topical chat.
- Tabs within the data types
- Virtual rooms
Bug fixes
- When changing the virtual room data of an object that was imported by a channel, the section is now automatically locked, so that it is not reset when running the channel again.
9 December 2025
Features and improvements
Exhibitor dashboard
- In the leads dashboard, you can now also find attendees that have dropped their business card. An option is added in the Status filter at the top of the list to filter out those attendees. When exporting, you see their full profile, including the email address and other contact details. Please note that they might not have a representative attached when they only dropped their card.

- On the exhibitor dashboard that allows editing an exhibitor's profile, you can now also update the links on the Resources tab. Before, this was not possible after the resource had been approved. Please note you cannot edit an existing link, but you can delete it and re-add the new link.
Bug fixes
Channel import, Excel and and locking
- When updating the session banner image or video through the channel, the changes are now correctly pushed to the app in the next release. Before, you had to re-save the object to push those changes.
- Importing data with a channel while making some changes manually now works as expected. Before, some manual changes were deleted when the channel was run again.
- When editing data, that has been added with a channel, through Excel, the data is now correctly updated and if needed, locked. When you replace a referenced object or link in a cell, the old object or link is deleted and locked, and the new object or link is added and locked. When you remove a value in a cell, either a field such as the subtitle, or a reference to another object such as a tag, a warning is given in the import. If you confirm, the field is cleared or the reference is removed and locked.
News messages
- When typing in the time a news message should be sent while the timezone is set to Event timezone, it is now scheduled correctly. Before, it was scheduled in the Local timezone and thus off when this was not the same as the Event timezone.
- When creating a news message without image, and then editing the message to add the image, the image is now stored correctly. Before, it was removed after the message was saved,
Other
- When turning off Networking features in the event settings, the chat for institutions is also turned off. Before, it remained on, but the tab was no loinger visible so it couldn't be turned off.
24 November 2025
Features and improvements
The App settings, that can be found on society level, have been updated. Most of the settings are the same as they used to be, but they are reorganised and regrouped.

Changes compared to the previous version of the settings are:
- On the tab Sign in, you can now choose Both, that will result in allowing both email and custom login in the apps. Before, you had to choose one of the two.
- The header image of the verification and password reset emails now has the same dimensions as that of the event invites: 900x450.
17 November 2025
Features and improvements
- You can now create scheduled jobs that will show a notification in the app. In Integrations > Scheduled jobs, tick the checkbox Show notification on the mobile app for every release. Be mindful about using this, as generating many notifications might result in annoyed users.

- You can now batch-edit programme items to show the recording in the host dashboard in their session banner. Select the programme items, choose Set session banner, and select the option Recording in host dashboard in the modal.

- You can now access-restrict the social wall and attendee list to one or multiple groups. Go to Pages > Pages, click Networking pages and select the attendee list or social wall.Just add the groups that should have access in the field. Only members of those groups will be able to access the page.

- Additionally, you can add a subtitle to the attendee list, that will appear right below the title. You can use this for example to explain your attendees who they can find in the list and what they can search for.
Bug fixes
- When importing attendees with Excel, the numbers of attendees that are created or updated in the confirmation are now correct. Before, every user was marked as updated, even when nothing changed.
4 November 2025
Features and improvements
Improved linking between persons and attendees
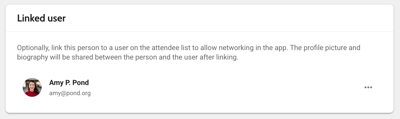
Before, it was already possible to link a user on the attendee list to a person in the event data, so that when accessing the profile of that person, networking features can be used, such as contact requests, chat or meetings. We have improved a few things regarding this.
The component to link a user to a person has been updated and can now be found at the top of the page.
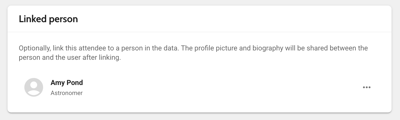
A similar component can also be found on the attendee page, so that you can also create the link from there:
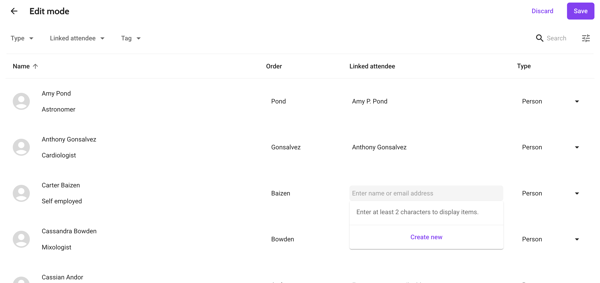
In the Person table, you can enable the Linked attendee column in the table settings. You can then see the attendee each person is linked to. In Edit mode, you can quickly link the persons to existing attendees, or choose Create new to create a new attendee.
Please note that unlike before, where you could link many persons to the same attendee, the relation between a person and an attendee is now one-to-one.
When a profile picture or bio is added In either the person profile, or the attendee profile, they are always shown in the app, regardless of whether the app user is signed in or not. If they are added in both places, that of the attendee takes priority.
An additional improvement in the app is that when opening an attendee from the attendee list, the linked sessions and presentations are shown on the profile. Before, they were only shown when accessing the profile from within the session or presentation.
Import badge bar code
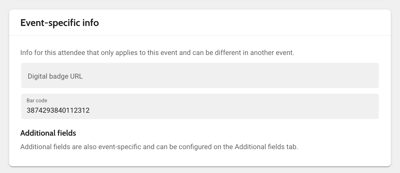
You can now import badge bar codes into an attendee profile. Add the column 'barcode' in the sheet and import it. You will see the bar code in the attendee profile, below Event-specific info. When scanning the bar code that translates to this number with the in-app QR code scanner, the user profile linked to this code will open. This way you can easily allow networking between attendees or lead scanning: all they need to do is open the in-app scanner and scan the attendee's badge bar code to open their profile.
Other
- The gamification Achievements page was added to the Networking and profile pages. This allows you to directly link a navigation button on the home page to it.
- When an ExpoFP location is set, the Location set column in the Places table also gets a checkmark. Before, it would only show when a location on the platform floor plan was linked.
Bug fixes
- When creating a schedule page that is filtered by a tag, you can now search in all tags. Before, only the first 100 tags were shown.
- The Backstage access column now accurately reflects the backstage access roles in the selected event. Before, it would show the roles across all events.
- In the exhibitor booth, tags are now also shown when there is no other content on the page. Before, they were hidden.
27 October 2025
Features and improvements
News messages
The news messages page on both society and event level has been updated.
Targeted messages to groups and general news messages to your entire community or all attendees of an event, can now be found in the same table. The table is sorted by send date, and you can filter the messages based on the receivers (All or Selected groups) and on the status (Sent or Scheduled).

From the top right, you can add a new message with the Add message button. The process consists out of 3 steps:
Select receivers
Choose who should see your message. For app messages, Everyone means all community members. For event messages, it means all users that have access to the event. When choosing Selected groups, you can choose one or multiple groups, and choose whether the receivers should be a member of all groups (for example Members AND Students) or one of the groups (for example Members OR Students). You can also select a country to send the message only to attendees that have this country set in their profile. Click Continue for the next step.

Add message content
Add the message subject, choose whether you want to send a push notification, and add the body text. Simple markup is allowed. Optionally, add an image or video link to the message. Videos must be hosted on Vimeo or YouTube. Click Continue for the final step.

Choose send date
Select whether you want to send the message right away, or schedule a date in the future. Optionally, you can add an expiration date. The message will disappear from the feed after this expiration date. This can for example be handy for messages about sessions, that are no longer relevant after the session has ended. Then to send or schedule the message, click Send message or Schedule message.

In the table, click ... and choose Edit to open the message detail page, for example to correct a typo or add an expiration date. Please note that some data can no longer be edited after the message was added (for example the groups it's sent to) or the message send date has passed (for example whether the message should have a push notification).

For messages you sent to selected groups, you can check who has received the message by choosing View receivers. Select Delete to remove the message from everyone's feed, and to cancel the push notification if the message hasn't been sent yet.
Set list layout for programme items
You can now choose to display the content on the detail page of programme items in a scrollable list, instead of on different tabs. This is handy when you don't have a lof of information and having it on different tabs is too much.
In the data types of programme item, select List below Layout. In the app, the content on the different tabs is then displayed in one list, from left to right, top to bottom.

Additional fields for attendees
On the Attendees menu item, a new tab Additional fields has been added. On this tab, you can add event-specific text fields.


If set to be Visible to attendees, the field is visible when editing your profile from the web or mobile app, right below the Country field. It can also be found in the studio, in the section Event-specific info.
Besides that, it can also be found on the public profile of an attendee, so that other attendees can see it. You can search for anything in this field in the search bar on the attendee list.
The order of the fields is the order in the table; you can drag the fields to rearrange then. The Field ID can be used to link the field to an external system, when you use an attendee sync or profile sync.
Other
- On the Pages menu item, the category Networking pages now contains more pages. All these pages can now be linked to from any place where you can select a page, for example a home menu navigation button or a bottom menu item on mobile.

- The Instagram URL can now be imported to attendees with an Excel import. The column, which is named
contactInstagramUrl, can also be found in the template and the export. - In the event settings, Language tab, a search box was added to search in the strings. you can search by description, key name, or translation.

- You can now batch-lock or -unlock entire objects through the table. Select the objects you want to (un)lock, click ... and choose Change lock status. Set the status to Locked or Unlocked and save your changes. Please note that objects that were not imported with a channel, are ignored.

Bug fixes
- When creating a new institution type, the default is now correctly set to Exhibitor booth. Before, it was set to Side panel, even though in the UI it looked like it was set to Exhibitor booth.
- The sponsor banner that can be uploaded in the studio for a virtual room s displayed again.