You can access the campaign management tool in two different ways:
- In your event, go to General > Emailing.
All existing campaigns for this specific event are listed. From there, you can manage existing campaigns or create new ones.
- In your account, go to the left side bar menu and click on Emailing.
All the existing campaigns created on your account will be listed. From there, you can manage existing campaigns or create new ones.

How to use our power Emailing campaign tool?
To create a new campaign, start by clicking on the + Add campaign button in the top right corner.
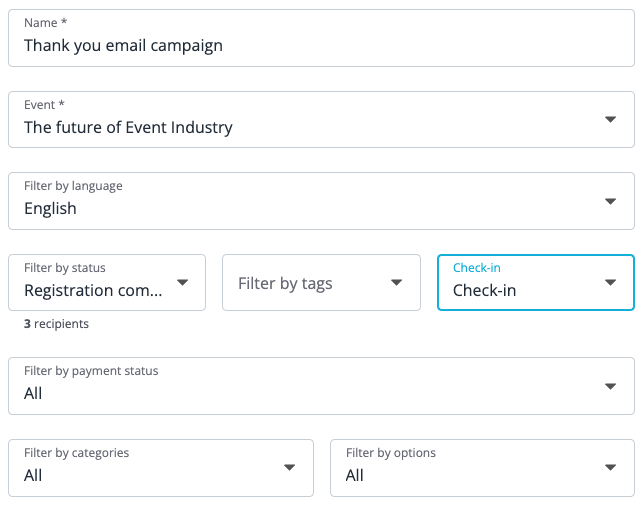
Select the name of your campaign and to which event your campaign is related.
Once it is done, target your audience by adjusting the different filters available on the page. You can filter by language (if you have a multilingual event), registration status, tags, check-in status, payment status (in the case of a paid event), categories and options (if applicable).
The number of your campaign's recipients is displayed below the Filter by status field. This number is updated automatically depending on your filters.
For example, if you would like to send a Thank you campaign to all the persons that registered and actually came to your event. You would need to filter your campaign on the Registration complete status and also on the Check-in status.
After finalizing the filters settings of your campaign, you can now enter the Subject of your campaign.
Use the WYSIWYG content editor to write and design your email. Improve your email communication by using Conditions and Merged fields.
Don’t worry about the look and feel of your campaign. You already took care of it without knowing! The logo, cover image and basic information of your event are re-used in your campaign, so you only have to focus on the content and target group.

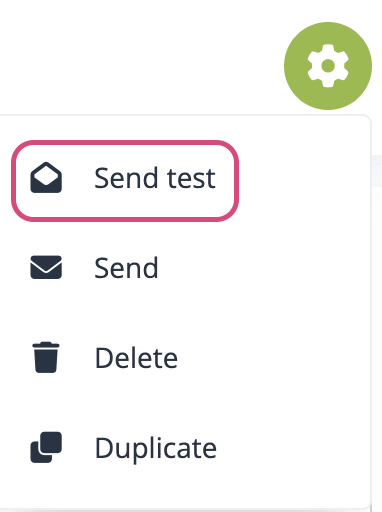
To get a sneak peak of what your campaign will look like, simply click on the More actions button and select Send test. The user who clicks on Send test will receive the test. Please note you need to have at least one person in your recipient list for the test to be correctly sent.
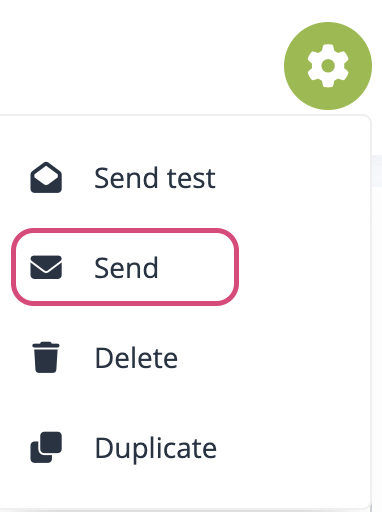
When you are ready to send your campaign, you can do it also by using the More actions button and selecting Send. You can also schedule your campaign and have it distributed on a specific date. If you select this option, please make sure to add a correct time zone.
Now that you have created and saved your campaign, it will appear in the campaign list page. From there, you can filter your campaigns depending on their status (Pending, Scheduled, Sent), your events or your profile.
Tips:
- Always send a test first! The user who clicks on Send test will receive the test.
- The emails are fully branded with your event’s logo, colors, and cover image so you can focus on the content and target group.
- All merged fields and other customization options available for automatic emails are also available with the emailing module.
- Be very careful when scheduling an automatic campaign. Make sure you’re only scheduling it after you have finalized the set-up.
- Easily duplicate an existing campaign to gain time.