Why use check-in?
Check-in is a feature designed for users to track their attendance at the event. While users can favourite items to plan where they might go, they can check in once they have actually attended a session. Checking in can be done in two ways: by allowing the users to check in themselves, or by scanning them at the room entrance to check them in.
How does it work for attendees?
Self check-in
If self-check-in is enabled by the organiser, you can find a button Check in on a session’s detail page. Click the button to check in to the session, click it again to check out. This allows you to track your activities and to send the report of sessions attended to the organising committee.

On-site session check-in
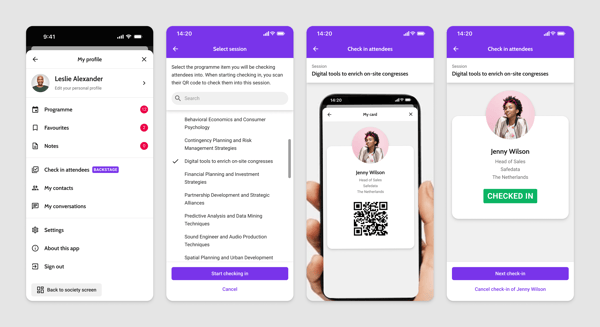
If on-site session check-in by a host is enabled, you will find the Show QR code to check in button on the session page instead. This opens a page with a QR code that you need to show to the host at the room entrance. After you're scanned, the button changes to Checked in.

How does it work for hosts?
Anyone that is invited as a host, will get an additional item Check-in attendees in the profile menu when signed in. When clicking that, they should select what session they will be checking attendees into. After clicking Start checking in, they can start scanning the user's QR codes to check them in. After checking someone in, a confirmation is shown. From here you can cancel the check-in, or proceed to the next one. This confirmation auto-closes after 3 seconds, so that you can quickly scan the next one.
Enable check-in within the app
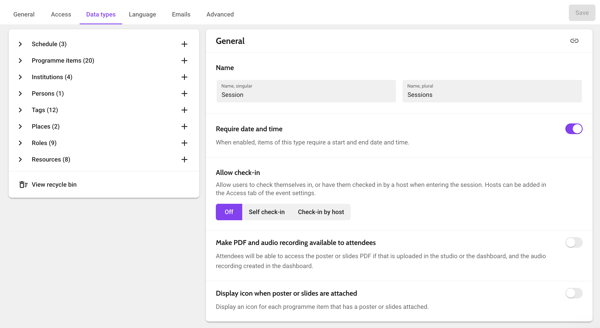
Enable check-in in the data types
Go to Event settings > Data types and select the programme item type you want to turn on check-in for. Below Allow check-in, choose whether you want to allow users to check themselves in, or to allow them to be checked in by a host.
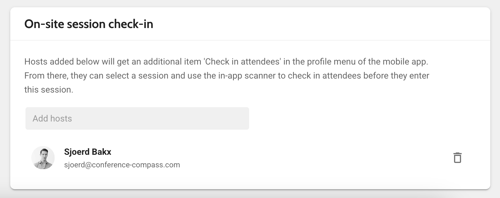
Add the hosts that can check-in users
If you use host check-in, you will need to add the hosts that can check-in attendees. These hosts will get special rights in their app.
Go to the event settings, tab Access, and scroll down to the section On-site session check-in. Add the email addresses of the users that should be checking in attendees. These users need to be on your attendee list: if they aren't there yet, you can add them.
Review check-ins per session or per attendee
Create export from the mobile app
 After the event, the user can see an overview of all their check-ins in their profile > My check-ins. Click the share button to create a report of all sessions attended, their duration and the total number of hours. As an organiser, you can request this report from the user to award CME credits.
Review and edit the list of checked-in users in the session page
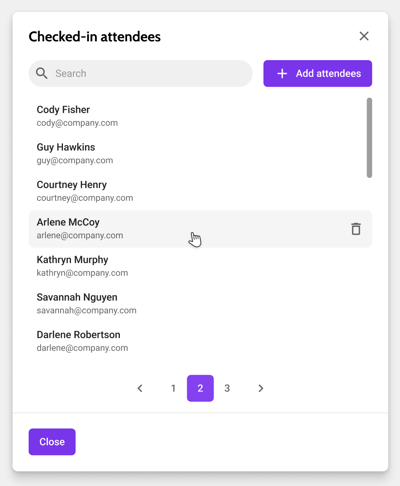
In the session page you can access through the Data > Programme items, you can see who checked in to your session. Scroll down to the section Session registration & check-in, and click the button View checked-in users.
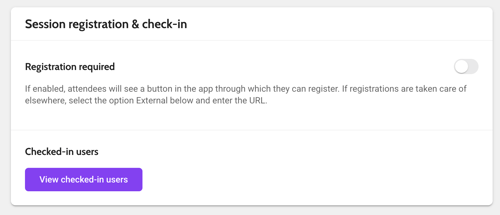
This opens a pop up where you can see all checked-in attendees. From here you can search for any attendee, and add or remove someone from the list.
Review event analytics
In the analytics, you can also see some numbers about the checkins.
In the analytics, you can only find the self check-ins! Check-ins done by a host are not included.
-
 On the tab Event engagement, you can find the total number of (self) check-ins at your event in the selected period. When clicking that block, you see a graph of the number of check-ins per date, and a list of sessions that were checked into the most.
 - Through the tab Objects, you can access a list of all programme items. Click the block Programme items, and then choose View all in the top 5 Most viewed programme items and select the session you want to know the details of. In the list that opens, you can check per attendee whether they checked in (1) or not (0). You can also export this table through the button Export programme item.
- On the tab Attendees, you can see a list of all attendees after scrolling down to the Attendees block, and then clicking View all. Here you can see the total number of items checked into for every attendee. If you want to know to which sessions these attendees checked in to, you can create a CME export. This export contains a row for every user-session combination that has (self) check-ins, or virtual or on-demand recording minutes.